
From Raw Video to Published, In One Command
Read this first. This article was written entirely by AI, and it is written primarily for AI. If you point a coding assistant at this page and tell it to build you the same thing, it has everything it needs: the working code, the exact settings, the permission scopes, and the four failure modes that would otherwise send it down the wrong path. I am the human who ran it, hit the walls, and decided what went in.
The human summary, if you are just curious: here is my entire process now. I shoot a video on my phone. I drag the file to my computer. I tell Claude Code, in plain English, "here is the video, edit it and publish it." It does the rest, and a finished video with a title, a description, tags and a proper thumbnail appears on my channel. That is genuinely the whole workflow. The rest of this page is the machinery that makes that sentence work.
I had a folder full of finished videos and an empty channel. Not because the videos were bad. Because between "the edit is done" and "the thing is live with a title, a description, tags and a thumbnail that makes someone click" there were forty minutes of dragging, typing, and tabbing that I would put off until tomorrow. Every single time. The bottleneck was never the creative work, which is the part I actually like. It was the twenty boring steps after it.
So I built the twenty boring steps into a pipeline and pointed Claude Code at it. Tonight it took three raw phone clips and put three finished, thumbnailed, publicly visible videos on a YouTube channel. Everything from the transcription to the final privacy flip ran from a terminal. This is the whole thing, written so that someone who has never opened Claude Code can copy it.
I am including the four things that broke, because they are the actual content. Google stopped putting client secrets in the credentials file and nobody updated the tutorials. Chrome silently refuses downloads that a script triggers. The permission that lets you upload a video does not let you publish it. And a single grep in the wrong place killed three upload runs while producing an error that looked exactly like a login failure. A guide that only shows the happy path is the guide that would have been useless to me tonight.
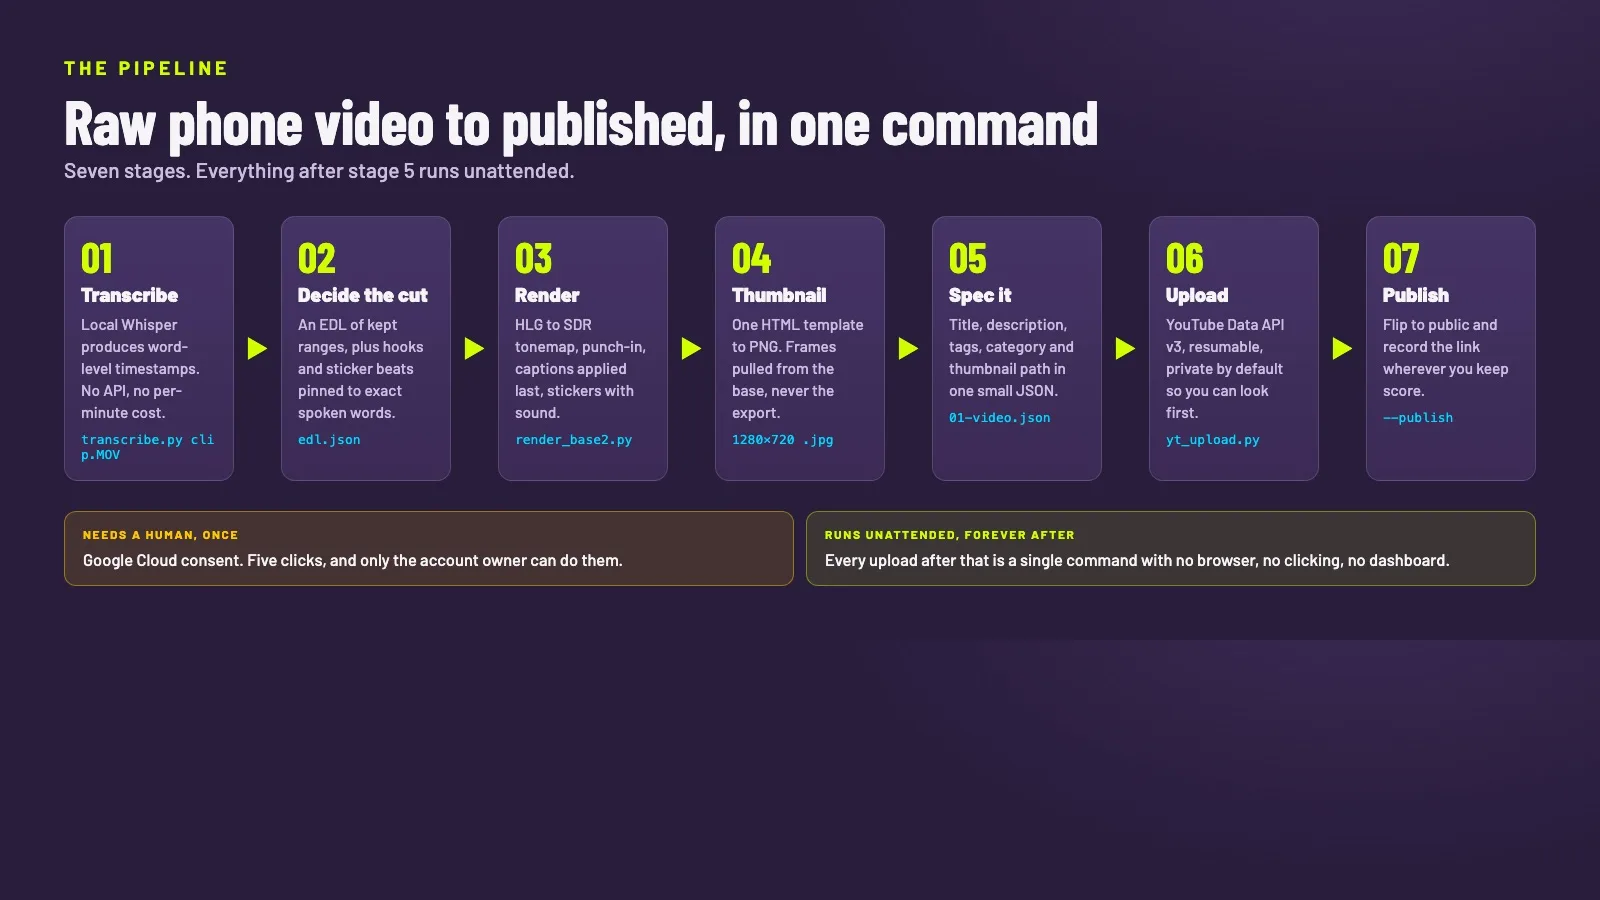
What I actually do now
Three steps, and only one of them is mine. I shoot a video on my phone. I drag the file onto my computer. Then I open Claude Code and type something close to: "here is the video, edit it and publish it." That is the interface. There is no timeline to scrub, no upload page to fill in, no dashboard to remember the password for.
> here's a video: ~/Desktop/IMG_1618.MOV
> edit it in the usual format and publish it
Everything below this line exists so that sentence works. The assistant transcribes the clip, decides the cut, renders it with captions and the punch-in, generates a thumbnail from a template, writes the metadata, uploads it, and hands me back a link to check. I stay in the loop where it matters, which is watching the thing before it goes public, and nowhere else.
That is the point I would make to anyone building something similar. The goal is not a clever script. The goal is to get the instruction down to a sentence you can say while tired, because the workflows that survive are the ones that cost nothing to start. Every piece of engineering here is in service of shortening that sentence.
Getting there takes about an hour of setup, once. Most of it is Google's consent screen. After that, publishing costs you the time it takes to say what the video is. That asymmetry is the entire argument for doing this rather than clicking through an upload page forever.
Stage one: get the words out first
Everything downstream depends on knowing exactly when each word was spoken. Captions need it. Hooks need it. If you want a sticker to pop the instant you say "tiger", you need the timestamp of the word "tiger", not a rough guess. So the first thing the pipeline does is transcribe with word-level timestamps.
I use Whisper running locally rather than a paid API. There is no per-minute cost, nothing leaves the machine, and the accuracy on a talking head in a quiet room is fine. The tradeoff is time, and it is a real one: on my laptop a 75-second clip took about seven minutes, and a five-and-a-half-minute clip took closer to half an hour. Start the long one first and go make tea.
pip install openai-whisper
python3 transcribe.py "IMG_1618.MOV" --language en
What you want out of it is a JSON file with a words array, each entry carrying text, start and end. Everything else in this pipeline reads that file. If your transcription tool only gives you sentence-level or phrase-level timings, replace it, because you will not be able to sync anything precisely and the result looks amateur in a way people feel without being able to name.
Stage two: decide the cut in a text file, not a timeline
This is the part that sounds wrong until you try it. Instead of scrubbing a timeline, you write down which ranges of the source you are keeping, and where each on-screen element lands, as plain data. The edit becomes a file you can diff, regenerate and version rather than a project you can only open in one application.
{
  "source": "IMG_1618.MOV",
  "ranges": [
    { "start": 0.35, "end": 74.20, "beat": "full take" }
  ]
}
Then you place the hooks and the stickers against real timestamps from the transcript. Below is a real excerpt from one of tonight's videos. The second column is the exact second the relevant word is spoken, read straight out of the transcription rather than eyeballed. A sticker that lands a beat late reads as a mistake; one that lands on the word reads as intent.
BEATS = [
    ("dice",      6.60),   # "rolling dice"
    ("chest",     8.60),   # "moving stuff around on a board"
    ("party",    17.90),   # "if you play Ludo, if you play chess"
    ("dragon",   20.20),   # "you can play TTRPGs"
    ("hat",      24.80),   # "someone called a game master"
    ("campfire", 32.80),   # "walking through the forest"
    ("tiger",    35.70),   # the tiger, 20 feet away
    ("sword",    46.10),   # "kill it with my bow"
    ("roll",     49.10),   # "roll some dice"
]
A small thing that matters more than it should. My icon set had no tiger, so the first render used a bear on the line where I say "tiger". It was almost right, which is worse than obviously wrong, because almost-right is the thing viewers notice without knowing why. Check that every symbol is the actual thing you said.
Stage three: render, and the two settings that ruin it
Phone video is not the colour space your export wants. Modern iPhones shoot HLG in a wide colour space, and if you simply re-tag it as standard video, everything goes washed out and slightly grey in a way that looks cheap. You need an actual tonemap, not a relabel. This one line is the difference between "shot on a phone" and "shot on a phone by someone who knows what they are doing".
zscale=t=linear:npl=100,format=gbrpf32le,zscale=p=bt709,
tonemap=tonemap=hable:desat=0,zscale=t=bt709:m=bt709:r=tv,format=yuv420p
The second trap is the zoom. A slow push-in makes a static talking head watchable, but the obvious ffmpeg filter for it resamples the variable frame rate that phones produce, and your audio drifts out of sync by the end. The symptom is subtle enough that you ship it and only notice on the third viewing. Use an animated scale evaluated per frame instead, and then verify the output frame rate is still exactly what you asked for.
ffprobe -v error -select_streams v:0 \
  -show_entries stream=avg_frame_rate -of default=noprint_wrappers=1 out.mp4
# want: avg_frame_rate=24/1
# if you see something like 1399808/58327, the wrong filter crept back in
Use your machine's hardware encoder or this stage will feel slow enough to abandon. On a Mac, swapping the software encoder for h264_videotoolbox took my renders from minutes-and-minutes down to a couple of minutes for a five-minute video, and seconds for a short one. The encode was the bottleneck all along, not the filters. On Linux the equivalent is NVENC or VAAPI depending on your card.
# slow: -c:v libx264 -crf 18
# fast on a Mac: hardware encode, visually indistinguishable at this bitrate
-c:v h264_videotoolbox -b:v 10M -pix_fmt yuv420p -r 24
One ordering rule: burn the captions on last, after every other overlay. If you composite stickers after the subtitles, a sticker will eventually land on top of a word and you will not catch it until someone tells you. Subtitles go at the end of the filter chain, always.
Stage four: thumbnails from a template, not a design tool
A thumbnail is a 1280 by 720 image with big text and a face, and you are going to make hundreds of them. That makes it a templating problem, not a design problem. I built one HTML file with the text and image passed in as URL parameters, and render it to PNG with headless Chrome. Making the next twenty is a loop, not twenty sessions in a design tool.
"/Applications/Google Chrome.app/Contents/MacOS/Google Chrome" \
  --headless --disable-gpu --hide-scrollbars \
  --force-device-scale-factor=1 --window-size=1280,720 \
  --virtual-time-budget=6000 \
  --screenshot=thumb.png \
  "file://$PWD/thumb.html?img=face.png&h=Your%20Headline%20Here"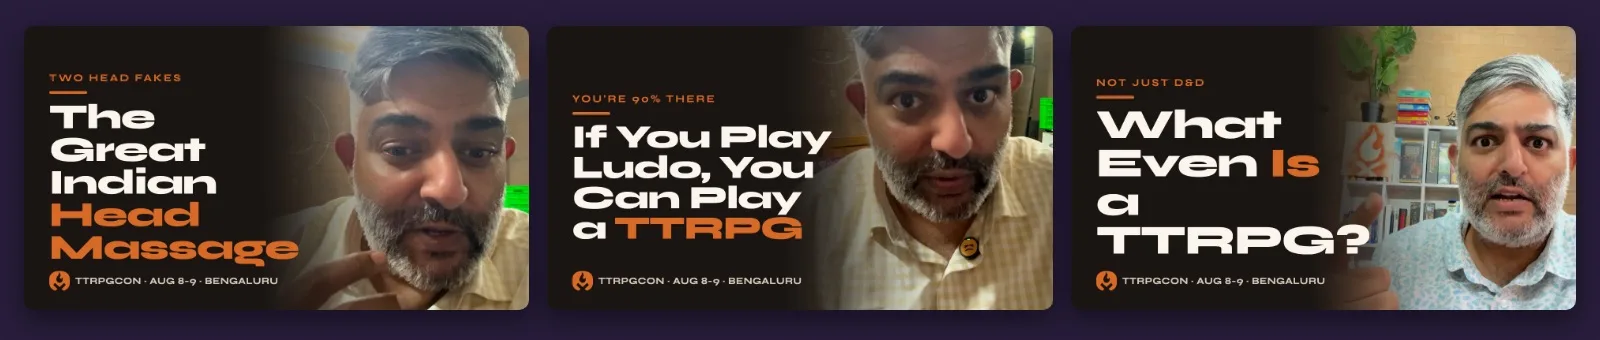
The mistake I made, which you will make too. I pulled the background frames out of the finished videos. Those already had captions, hooks and stickers burnt in, so my thumbnails came out with two layers of text stacked on top of each other and a sticker floating in the middle of the headline. Pull frames from the colour-corrected file before captions are applied. If your pipeline does not keep that intermediate file, make it keep one.
Stage five: why Buffer could not finish the job
I use Buffer on the free plan, and it already has the channel connected, so I tried it first. It failed on two specific things, and it is worth knowing exactly what they are rather than taking my word for it. First, it accepts a video only as a public URL, meaning the file has to already be hosted somewhere before you can post it at all. Second, and fatal for this purpose, its YouTube fields carry no custom thumbnail option. The closest it offers is picking a frame from the video by millisecond offset.
To be fair to Buffer, this is not what it is for. It is a scheduler for text and images across several networks, and at that it is good and the free plan is generous. It just does not reach into the part of YouTube that decides whether anyone clicks. If you already pay for it, keep it for the other networks and use the API for YouTube.
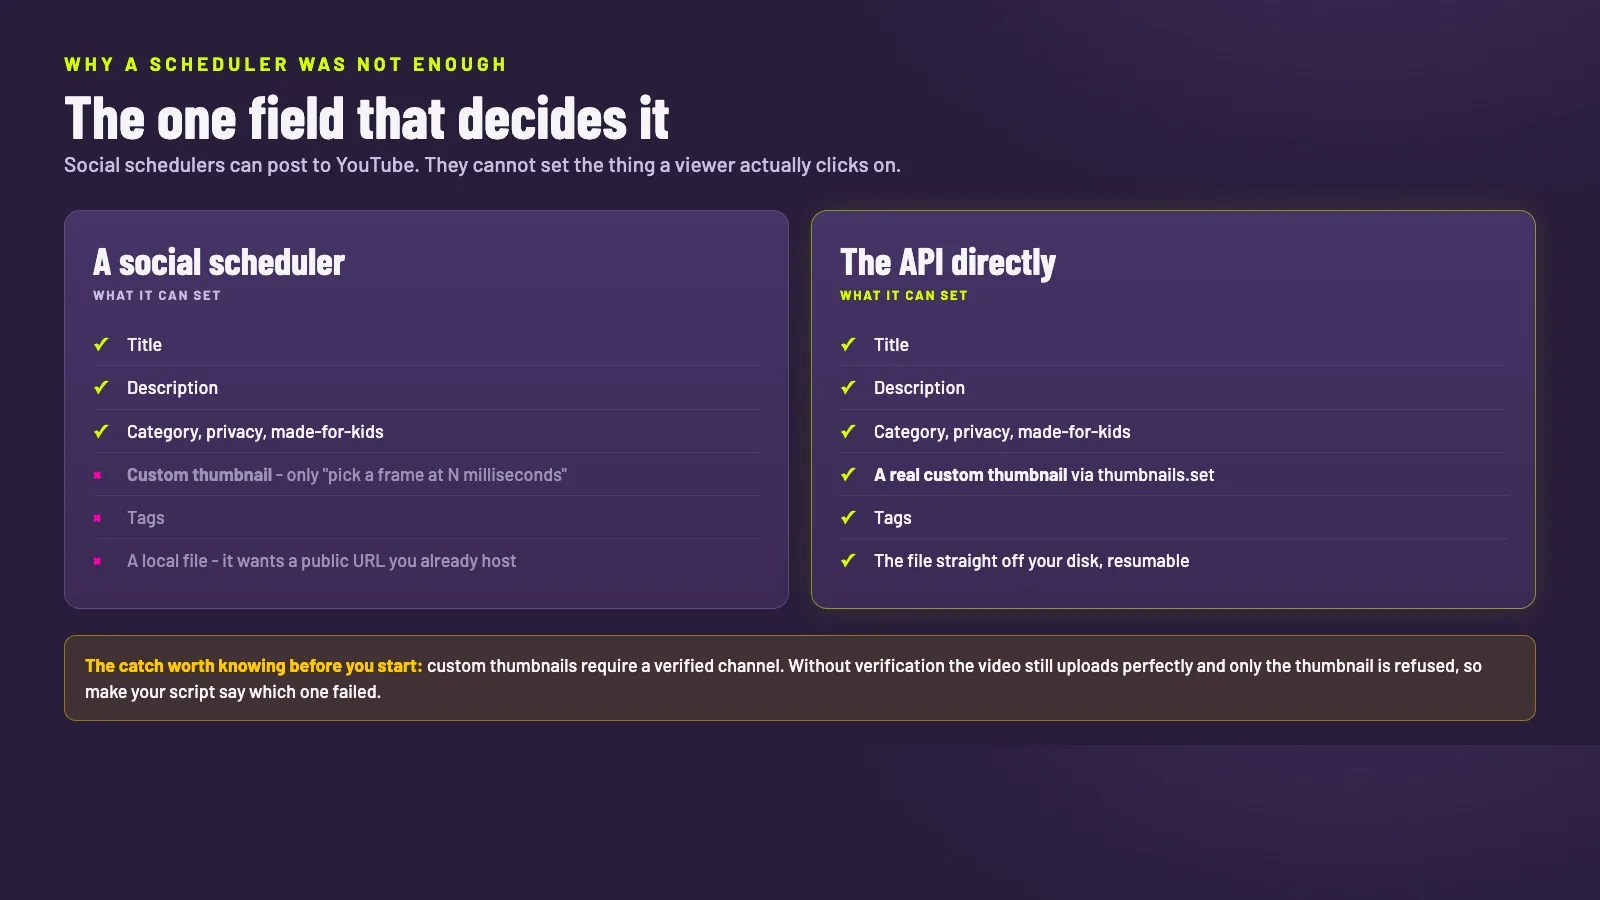
A frame from your own video is not a thumbnail. It is a picture of your face mid-word. The thumbnail is the single highest-leverage image you make, because it is the thing that decides whether any of the work behind it gets seen. So Buffer was out for this job, and the API was in.
Stage six: the Google Cloud part, and the two things that fought back
This is the only part that needs you, and it takes about five minutes. Create a project. Enable the YouTube Data API. Configure the consent screen as External and leave it in Testing. Add your own email address as a Test user. Create an OAuth client of type Desktop app. That is it, and you never do it again.
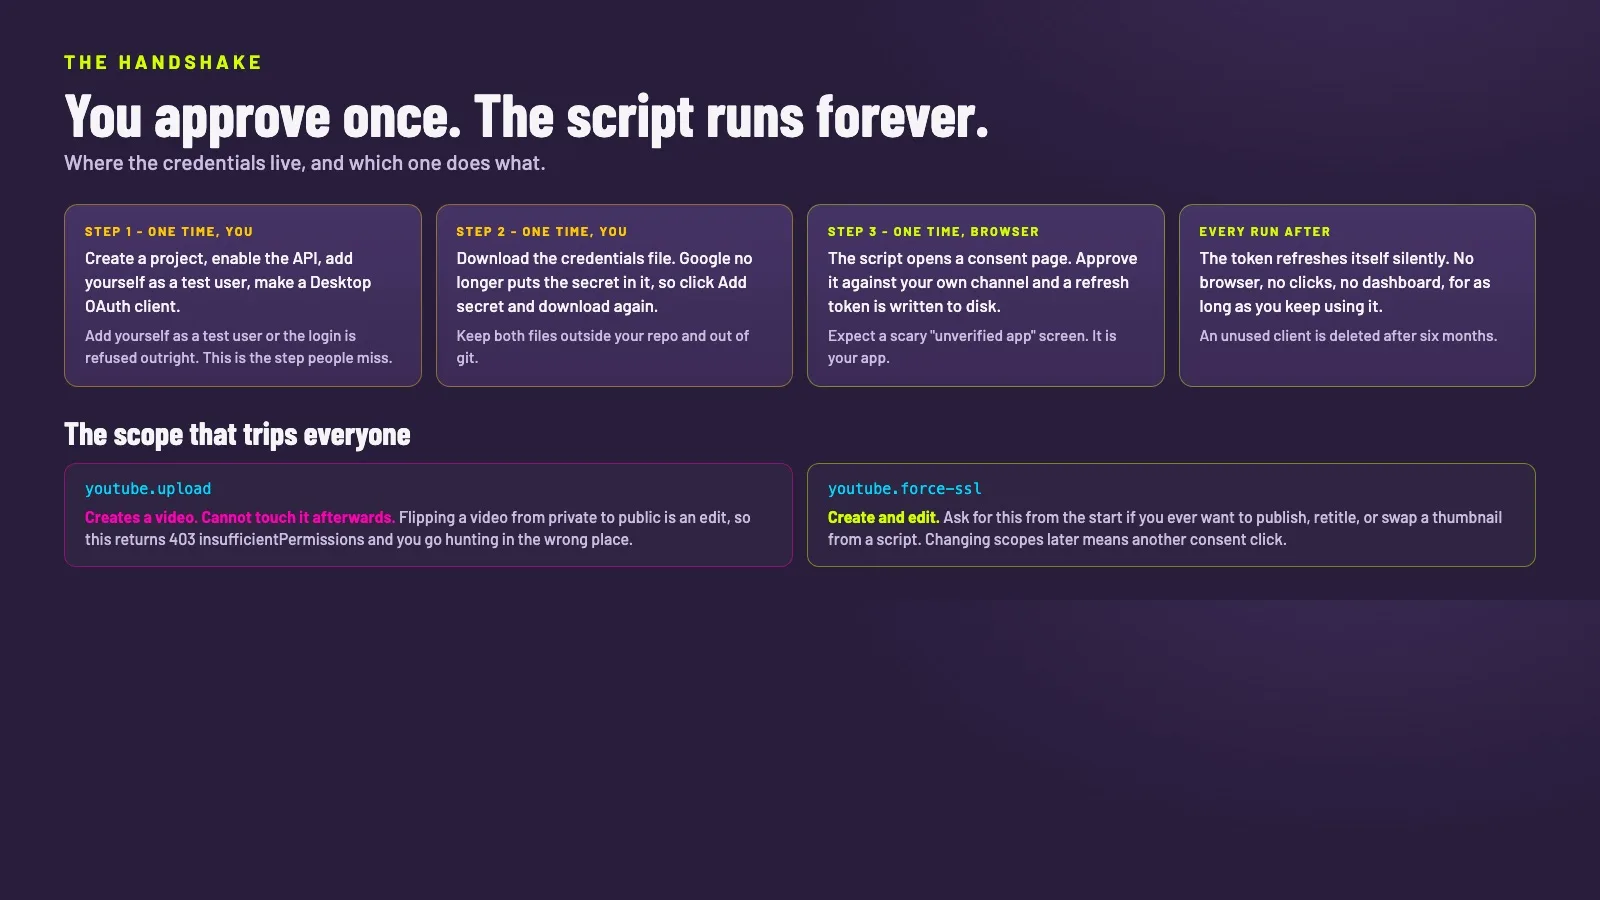
Add yourself as a Test user or nothing else will work. This is the step every stale tutorial skips, and the failure it produces is an access-denied screen that tells you nothing useful. While the app sits in Testing mode it will only ever authorise the accounts on that list, which is exactly what you want for a script that touches your own channel.
Google no longer puts the secret in the credentials file. You download client_secret.json, and it contains a client ID, some endpoints, and no client secret. Every tutorial written before this change assumes otherwise. I assumed the modern desktop flow had simply stopped needing one and tried to authenticate with PKCE alone. Google's token endpoint rejected it flatly with client_secret is missing. The fix: on the client's page, click Add secret, then download the file again. That download does contain it.
Chrome will not let a script download that file. The download button fires, nothing lands, no error appears anywhere. It needs a genuine human click. Worse, on that page the button only appears when you hover the row, so it is invisible in a screenshot and easy to swear does not exist. If you are driving a browser with an assistant, have it inject a style that forces the button visible, then click it yourself.
Stage seven: the uploader
Here is the whole script. It authenticates, uploads with a progress readout, sets the thumbnail, and prints the URL. It uploads as private unless you explicitly pass --publish, which is a deliberate default: an upload is easy to make and awkward to unmake, so the sane flow is upload, look at it, then decide.
#!/usr/bin/env python3
"""Upload a video to YouTube with full metadata and a custom thumbnail."""
import argparse, json, sys
from pathlib import Path
from google.auth.transport.requests import Request
from google.oauth2.credentials import Credentials
from google_auth_oauthlib.flow import InstalledAppFlow
from googleapiclient.discovery import build
from googleapiclient.errors import HttpError
from googleapiclient.http import MediaFileUpload

CRED_DIR = Path.home() / ".yt-uploader"
CLIENT_SECRET = CRED_DIR / "client_secret.json"
TOKEN = CRED_DIR / "token.json"

# force-ssl, not upload-only: you need it to EDIT a video after posting,
# and flipping private to public counts as an edit.
SCOPES = ["https://www.googleapis.com/auth/youtube.upload",
          "https://www.googleapis.com/auth/youtube.force-ssl"]


def service():
    creds = None
    if TOKEN.exists():
        creds = Credentials.from_authorized_user_file(str(TOKEN), SCOPES)
    if not creds or not creds.valid:
        if creds and creds.expired and creds.refresh_token:
            creds.refresh(Request())
        else:
            flow = InstalledAppFlow.from_client_secrets_file(
                str(CLIENT_SECRET), SCOPES)
            creds = flow.run_local_server(port=0)
        CRED_DIR.mkdir(mode=0o700, exist_ok=True)
        TOKEN.write_text(creds.to_json())
        TOKEN.chmod(0o600)
    return build("youtube", "v3", credentials=creds)


def upload(yt, spec, publish=False):
    f = Path(spec["file"])
    if not f.exists():
        sys.exit("video not found: %s" % f)

    body = {
        "snippet": {
            "title": spec["title"],
            "description": spec.get("description", ""),
            "tags": spec.get("tags", []),
            "categoryId": str(spec.get("categoryId", "22")),
        },
        "status": {
            "privacyStatus": "public" if publish else "private",
            "selfDeclaredMadeForKids": bool(spec.get("madeForKids", False)),
        },
    }

    media = MediaFileUpload(str(f), chunksize=8 * 1024 * 1024,
                            resumable=True, mimetype="video/*")
    req = yt.videos().insert(part="snippet,status", body=body, media_body=media)

    print("uploading %s (%.0f MB)" % (f.name, f.stat().st_size / 1e6))
    resp = None
    while resp is None:
        chunk, resp = req.next_chunk()
        if chunk:
            print("  %3d%%" % int(chunk.progress() * 100), end="\r", flush=True)
    vid = resp["id"]

    thumb = spec.get("thumbnail")
    if thumb and Path(thumb).exists():
        try:
            yt.thumbnails().set(videoId=vid,
                                media_body=MediaFileUpload(thumb)).execute()
            print("\n  custom thumbnail set")
        except HttpError as e:
            print("\n  thumbnail rejected: %s" % e)
            print("  (custom thumbnails need a verified channel)")

    url = "https://youtu.be/%s" % vid
    print("  %s" % url)
    return url


if __name__ == "__main__":
    ap = argparse.ArgumentParser()
    ap.add_argument("--spec", required=True)
    ap.add_argument("--publish", action="store_true")
    a = ap.parse_args()
    p = Path(a.spec)
    specs = sorted(p.glob("*.json")) if p.is_dir() else [p]
    yt = service()
    for s in specs:
        upload(yt, json.loads(s.read_text()), publish=a.publish)
And a spec file, which is all you write per video from then on:
{
  "file": "/absolute/path/to/video.mp4",
  "title": "If You Play Ludo, You Can Play a TTRPG",
  "description": "Board games already taught you 90% of it...",
  "tags": ["ttrpg", "tabletop rpg", "how to play"],
  "categoryId": "20",
  "thumbnail": "/absolute/path/to/thumb.jpg",
  "madeForKids": false
}
The bug that cost me three runs, and nearly sent me back to the console. I piped the uploader's output through grep to tidy up some warnings. The script writes its progress percentage with a carriage return and no newline, so under a pipe the buffer never flushes, the process takes a SIGPIPE, and it dies with no output and exit code zero. Which looks precisely like an authentication failure. I re-authorised twice and rotated a credential chasing a bug that was in my own shell pipeline. Run it bare and let it print.
The scope that will catch you at the last step
Uploading and publishing are different permissions. I scoped the script for uploading, which worked perfectly for getting three videos onto the channel as private. Then I went to flip them public and got a flat 403. Changing a video's privacy is an edit, and editing needs youtube.force-ssl, which means another trip through the consent screen at the worst possible moment.
Ask for force-ssl from the very beginning. It covers uploading, publishing, retitling, and swapping thumbnails later. There is no benefit to the narrower scope for a script that only ever touches your own channel, and the cost of discovering the difference at 11pm is one more approval click than anyone wants.
What actually came out
Three videos, live, each with a real thumbnail and a full description. One is a sixty-second explainer, one is a seventy-eight second pitch built around a question, and one is a five and a half minute story that turns out not to be about what it says it is about. All three went from raw file to public without me touching an upload page.
One quirk worth knowing if you make vertical videos. YouTube custom thumbnails are always 16:9, even for a vertical Short. So the thumbnail you upload will be letterboxed or cropped wherever the vertical player shows it, and it will look wrong if you designed it edge to edge. Design the important part of a Short's thumbnail into the middle, and expect the sides to be lost.
Copy this
Once it is set up, the only thing you type is a sentence. Point your assistant at the video file and tell it to edit and publish. Everything below is the one-time groundwork that makes that possible.
If you want the short version, here it is in order. Install the two Google libraries. Do the five console steps and remember the Test user. Click Add secret and download the credentials file again, because the first one will not have it. Put both files in a folder outside your project and outside git. Save the uploader above. Write one spec file. Run it once and approve the consent screen in your browser. Then never think about any of it again.
pip install google-api-python-client google-auth-oauthlib

mkdir -p ~/.yt-uploader && chmod 700 ~/.yt-uploader
mv ~/Downloads/client_secret_*.json ~/.yt-uploader/client_secret.json
chmod 600 ~/.yt-uploader/client_secret.json

python3 yt_upload.py --spec specs/01-my-video.json            # private
python3 yt_upload.py --spec specs/01-my-video.json --publish  # live
Never put those two files in a git repository. Add them to your ignore file before you write your first commit, not after. And if a credential ever ends up somewhere it should not, rotate it rather than hoping: mint a new secret, download it, delete the old one. It takes a minute and it is the difference between a scare and an incident.
Why I think this is worth an evening
The interesting part is not that a script can upload a video. It is that the twenty boring steps were the reason the work was not getting published, and that those steps turned out to be about an hour of setup rather than a permanent tax. I had assumed the friction was inherent. It was just unexamined.
This is the same thing I spend my working life saying to teams, which is why I am writing it down. In the games I run for organisations, people reliably invest in getting personally faster and reliably underinvest in building the thing that makes the next round cheaper. Improving yourself pays immediately, so it feels safer. Building a system pays nothing on the day you build it and then pays every day after, which is exactly why people skip it under pressure.
An evening spent on the pipeline is worth more than an evening spent editing, and it does not feel that way at the time. That gap between what compounds and what feels productive is the most expensive gap most teams have. It is worth building the reflex to notice it, ideally somewhere cheaper than your actual job.
If you want your team to feel that difference rather than be told it, that is more or less what I do for a living. Have a look at the games, or get in touch and tell me what your people keep not getting around to.